To install SII system integration for Dynamics 365 for Finance and Operations, it is necessary to complete the following steps:
- Import GER configurations (model and format)
- Import default setup (through data entities)
- Define formats references
- Setup executable class and batch
- Set up internet address for SII system and certificates
- Set up number sequence setup for Message numeration
- Select parameter Inter-community
- Set up user-defined parameters
To import GER configuration in Dynamics 365 for Finance and Operations, download SII configurations from Lifecycle Services (LCS). See the link below:
Download Electronic reporting configurations from Lifecycle Services
In the link Electronic reporting overview, you may find description of electronic reporting.
After importing configuration, check that Configuration provider is active.
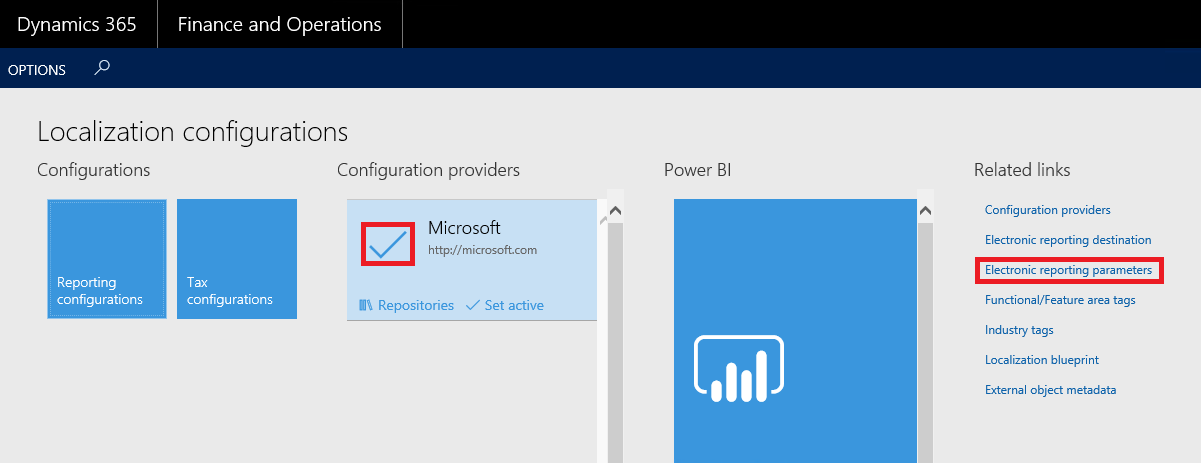
Press Electronic parameters button and check that all fields on Attachment tab filled in with File value.

You may find Data entities description under link:
https://docs.microsoft.com/en-us/dynamics365/operations/dev-itpro/data-entities/data-management-integration-data-entity
Data entities should be imported in the following sequence:
|
Order
|
Entity
|
Target entity
|
|
|
1
|
Electronic message item types
|
EMItemTypeEntity
|
|
|
2
|
Electronic message item statuses
|
ElectronicMessageItemStatus
|
|
|
3
|
Electronic message statuses
|
ElectronicMessageStatus
|
|
|
4
|
Message item additional fields
|
EMAdditionalFieldsEntity
|
|
|
5
|
Message item additional fields values
|
EMAdditionalFieldsValueEntity
|
|
|
6
|
Action class settings
|
EMActionClassEntity
|
|
|
7
|
Web service settings
|
EMWebServiceEntity
|
|
|
8
|
Electronic message action
|
EMActionEntity
|
|
|
9
|
Available statuses for action to change electronic messages
|
EMActionStatusFromEntity
|
|
|
10
|
Available statuses for action after change electronic messages
|
EMActionStatusToEntity
|
|
|
11
|
Electronic message processing
|
ElectronicMessageProcessing
|
|
|
12
|
Electronic processing actions
|
EMProcessingActionEntity
|
|
|
13
|
Additional fields for processing
|
EMProcessingAdditionalFieldsEntity
|
|
Define format references in Tax > Setup > Electronic messages > Message processing actions for following actions:
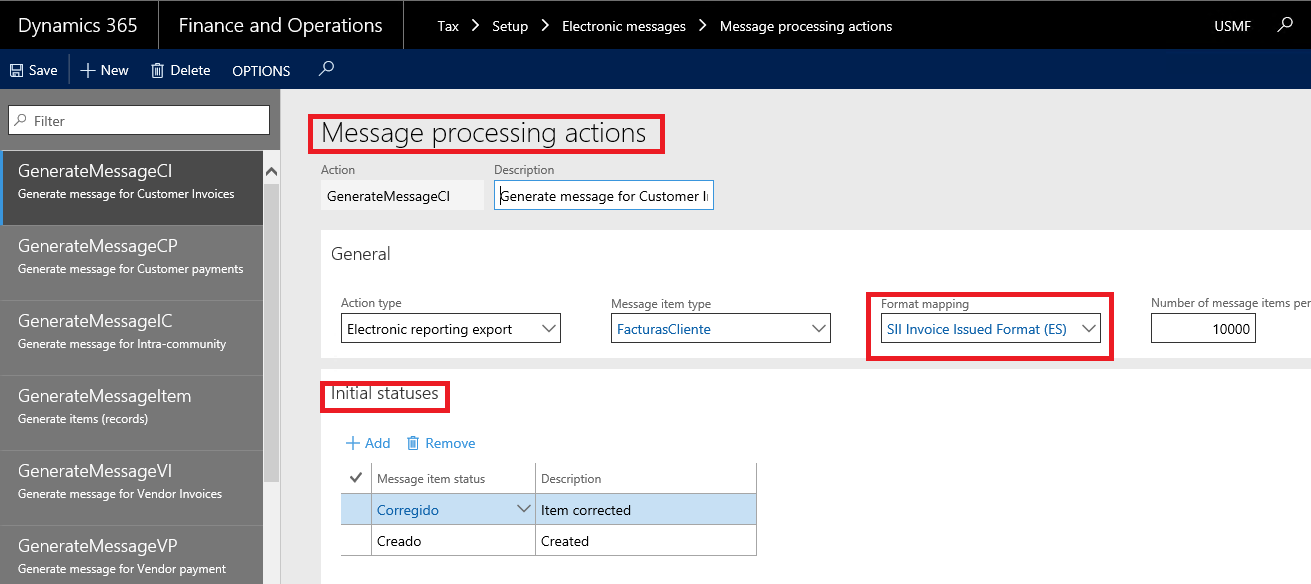
|
Action
|
Name
|
Format/ Model
|
|
GenerateMessageCI
|
Generate message for Customer Invoices
|
SII Invoice Issued Format (ES)
|
|
GenerateMessageVI
|
Generate message for vendor Invoices
|
SII Invoice Received Format (ES)
|
|
GenerateMessageIC
|
Generate message for Intra-community
|
SII Intra-Community Format (ES)
|
|
GenerateMessageCP
|
Generate message for Customer payments
|
SII Customer Payment Format (ES)
|
|
GenerateMessageVP
|
Generate message for Vendor payments
|
SII Vendor Payment Format (ES)
|
|
Re-GenerateMessageCI
|
Generate message for Customer Invoices
|
SII Invoice Issued Format (ES)
|
|
Re-GenerateMessageVI
|
Generate message for vendor Invoices
|
SII Invoice Received Format (ES)
|
|
Re-GenerateMessageIC
|
Generate message for Intra-community
|
SII Intra-Community Format (ES)
|
|
ImportResponse
|
Import response from web service
|
SII Import Model (ES)
|
Go to Tax > Setup> Electronic messages > Executable class setting
In the form Executable class settings, select Executable class name EMCreateItemsController.
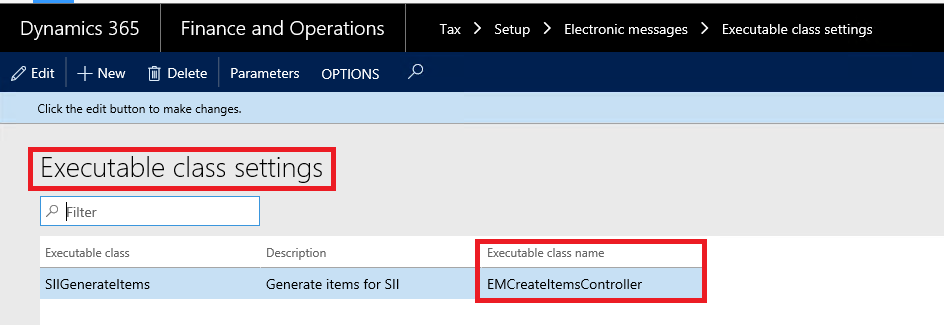
Press Parameters button and press OK button in the form Add new electronic message items.
If it is necessary, change dates for every invoice date. Press Filter button and set up date for every document type.

Go to Tax > Setup> Electronic messages > Web service settings
Insert internet address in the field Internet address for every document type:
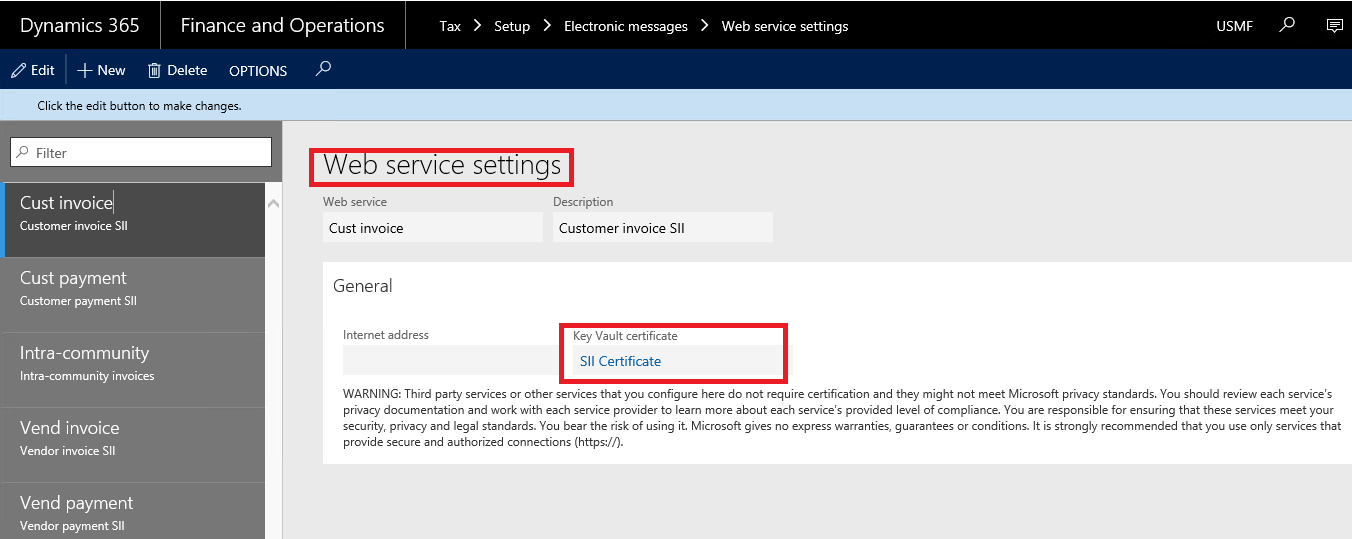
To set up certificate, select the certificate in Key vault certificate field (General tab) for Cust invoice, Vend invoice, Intra-community, Cust payment, Vend payment web services (the same for every Web service):
See Certificate setup under the links:
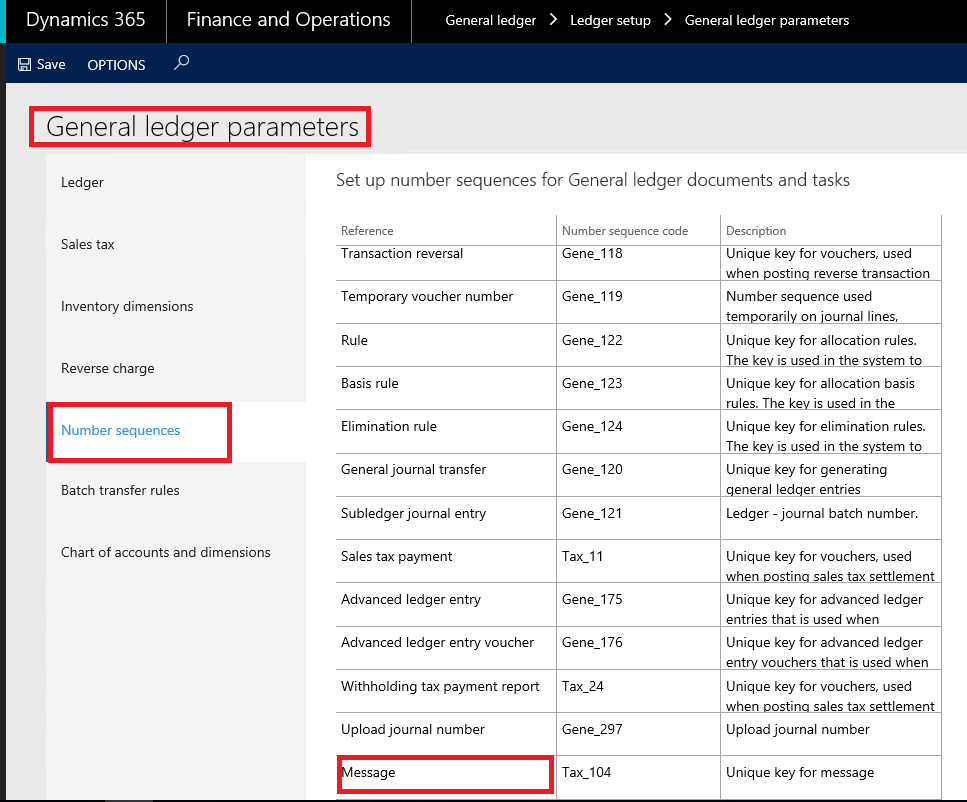
Go to Tax > Setup > Parameters > General ledger parameters, Number sequences tab.
Set up Message number sequence.
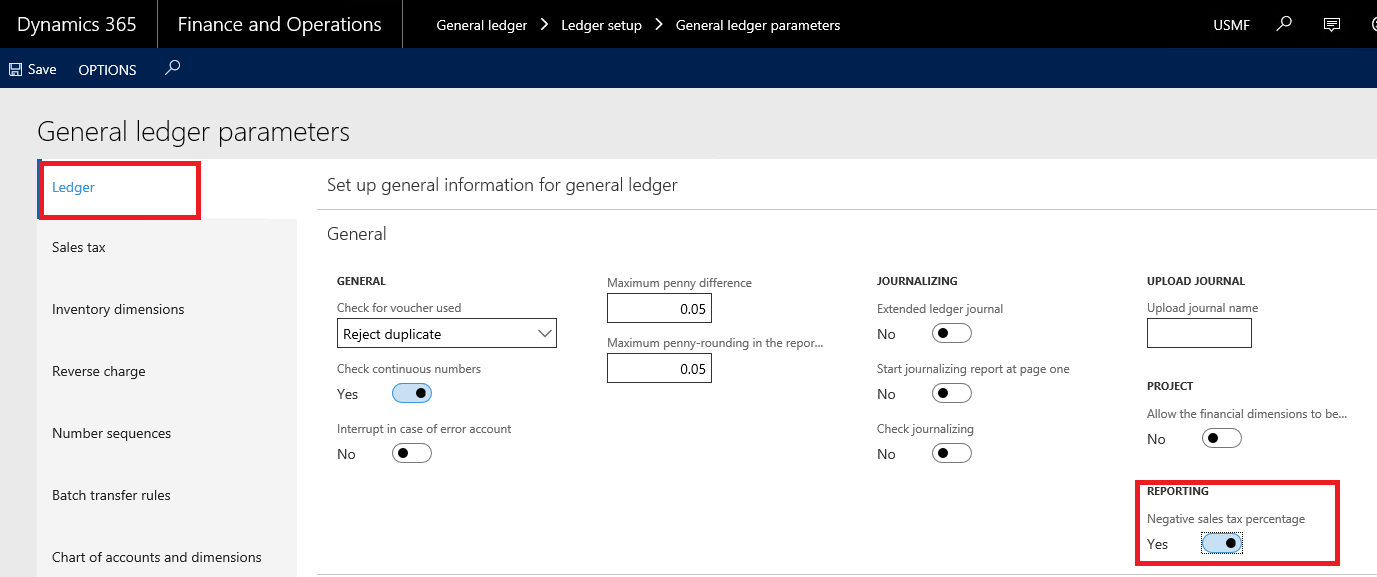
If several types of tax are set up in your AX company, you can include or exclude from SII register invoices with tax transactions Sales tax code of which is set up as "Negative tax percentage". To do so, use General ledger > Setup > General ledger parameters > Ledger, field group Reporting, Negative sales tax percentage check box.
If Negative sales tax percentage check box not marked in General ledger parameters, then:
- invoices that have only tax transactions with Negative sales tax percentage will not be added into the SII register.
- only sales tax transactions which have Sales tax codes with unmarked Negative sales tax percentage will be include into the XML file.
Go to Accounts payable > Setup > Accounts payable parameters, Ledger and sales tax tab, Sales tax, and select field Intra-community VAT.
When importing Data entities, you receive some pre-configured settings which do not need in additional setup (you may change description only):
- Message item types
- Message item statuses
- Message statuses
- Electronic message processing
User should set up additional fields, financial reasons and registration types for customers and vendors.
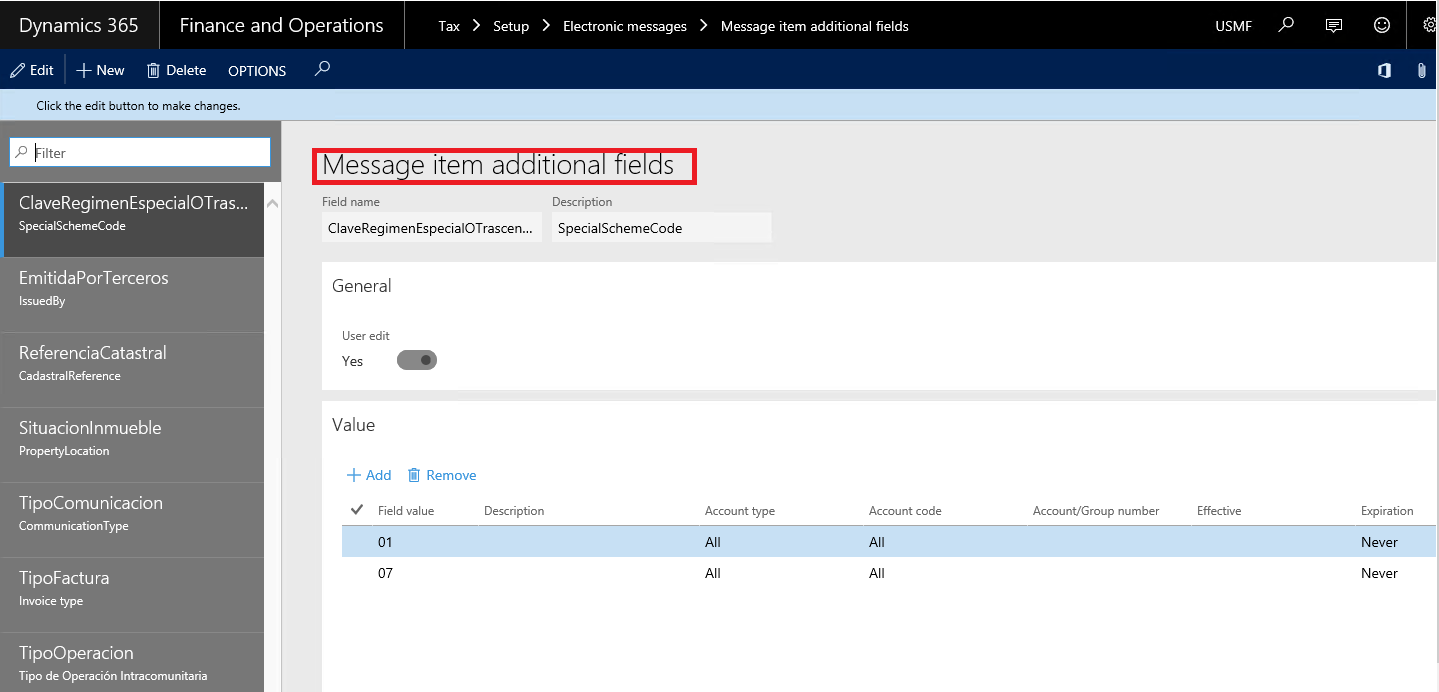
Go to Tax > Setup > Electronic messages > Message item additional fields
For all additional fields, fill in all values which used in you company. Values of additional fields should have All in Account type and Account code fields.
If you want different values are filled in automatically for specific customer/vendor or customer/vendor group or for all vendors/ customers, use Account type and Account code (you may use Account type = Customer/Vendor and Account code = All/ Group/Table).
To generate correct XML reports, you need to set up correct tax identification for your Company and for all your customers and vendors. To make it possible, you need to set up first additional Registration types and Registration categories. To do so, open Organization administration > Global address book> Registration types and Organization administration > Global address book> Registration categories.
The following new Registration types were added for Spain:
|
Name
|
Country
|
SII Code
|
Description
|
|
TAX ID (NIF)
|
ESP
|
02
|
Should be used for customers and vendors NIF
|
|
Passport (PASAPORTE)
|
ESP
|
03
|
Should be used for customers and vendors instead of NIF if NIF (TAX ID) is not registered for corresponding customer or vendor
|
|
Official identification document (DOCUMENTO OFICIAL DE IDENTIFICACIÓN EXPEDIDO POR EL PAIS O TERRITORIO DE RESIDENCIA)
|
ESP
|
04
|
|
Residence certificate (CERTIFICADO DE RESIDENCIA)
|
ESP
|
05
|
|
Other identification document (OTRO DOCUMENTO PROBATORIO)
|
ESP
|
06
|
|
Not registrated
|
ESP
|
07
|
|
For example, add a line like:
To generate correctly all types of SII XML schemes, you should set up Registrations IDs for:
- Company NIF
- All Customers
- All Vendors
Company NIF
To setup your Company’s NIF, open Organization administration > Organizations > Legal entity and set your Company’s NIF in Tax registration number field on Tax registration tab.
Customers registration IDs
To setup a Customer’s NIF, open Accounts receivable > Customers > All customers, select a customer, open Invoice and delivery tab, click Edit, fill in the Tax exempt number field. OR press the button Customer/Registration/ Registration ID and fill in Registration ID.
When XML scheme generating NIF value (corresponded to the TAX ID) will be used first or if there is no NIF set up for a customer, then the first one from the list of Registration IDs set up for the customer.
Vendors registration IDs
To setup a Vendor’s NIF, open Accounts payable > Vendors > All vendors, select a vendor, open Invoice and delivery tab, click Edit, fill in the Tax exempt number field. OR press the button Customer/Registration/ Registration ID and fill in Registration ID.
When XML scheme generating NIF value (corresponded to the TAX ID) will be used first or if there is no NIF set up for a vendor, then the first one from the list of Registration IDs set up for the vendor.
According with the official SII documentation, each (customers and vendors) invoice should be sent to the SII system with a mandatory indication of its type (TipoFactura tag). By default, for all the invoices this tag have the F1 value.
According with the official documentation, SII system supposes that a (customers and vendors) invoice may be any type of corrections of a previously registered in SII invoice due to one of the following reasons (that are applicable to Dynamics 365 for Finance and Operations):
|
TipoFactura
|
Description of a reason
|
|
R1
|
Corrected Invoice (Art 80.1 and 80.2 and error grounded in law)
|
|
R2
|
Corrected Invoice (Art. 80.3)
|
|
R3
|
Corrected Invoice (Art. 80.4)
|
|
R4
|
Corrected Invoice (Other)
|
Besides that, a Vendor invoice may have the following additional specific types that are applicable to Dynamics 365 for Finance and Operations:
|
TipoFactura
|
Description of a type
|
|
F5
|
Imports (DUA)
|
|
F6
|
Other accounting support material
|
To meet this requirement for Spain, an existing functionality of Financial reasons was extended for the following documents:
- Sales order
- Free text invoice
- Purchase order
- Projects
- AP journal
- GL general journal
Thus, when creating an invoice of different types of document where it is possible to create an invoice, user may set up a specific reason for an invoice. This reason will be transmitted with the invoice to the SII register. SII register functionality let user to change the reason manually if needed.
To set up Financial reasons, open:
- Organization administration > Setup > Financial reasons
The Financial reasons was extended with two additional field:
- Invoice type – to set up a specific code applicable for SII system
- SII code description – to enter a description
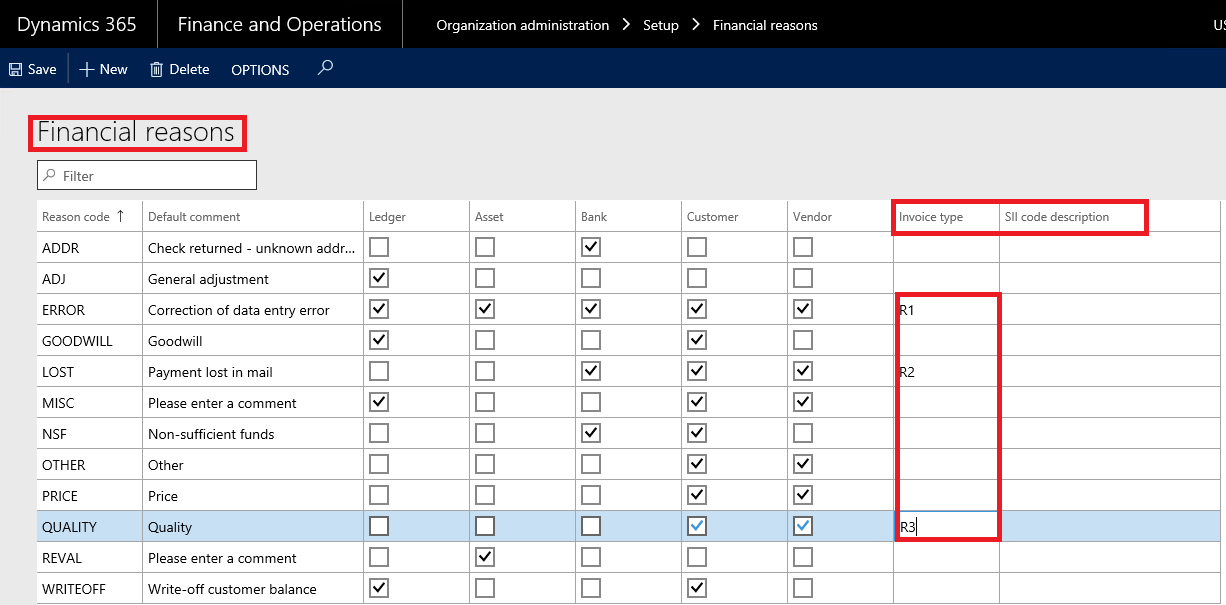
If an invoice or a credit note does not correspond to a code (R1, R2, R3, R4, F5, F6), user may leave the field Reason as blank in an invoice. Then the invoice will be transmitted with TipoFactura equal to F1 or F2 (simplified invoice).